
터칭 데이터
Streaming WordCount 예제 프로그램 본문
5. Spark Streaming 소개와 Kafka 연동
Spark Structured Streaming에 대해 알아보고 Kafka Topic을 사용하는 방법을 배워보자
Contents
1. Spark Streaming 소개
2. Spark 환경 설정
3. Streaming WordCount 예제 프로그램
4. Kafka Stream 예제 프로그램
5. 강의 마무리
Streaming WordCount 예제 프로그램
Structured Streaming으로 단어를 세는 프로그램을 만들어보자
WordCount 예제
Spark에서 제공해주는 예제 프로그램
○ TCP 소켓에서 수신 대기 중인 데이터 서버로부터 수신한 텍스트 데이터의 단어 수를 세고 싶다고 가정
이를 위해 Netcat을 데이터 Producer로 사용 (터미널 1)
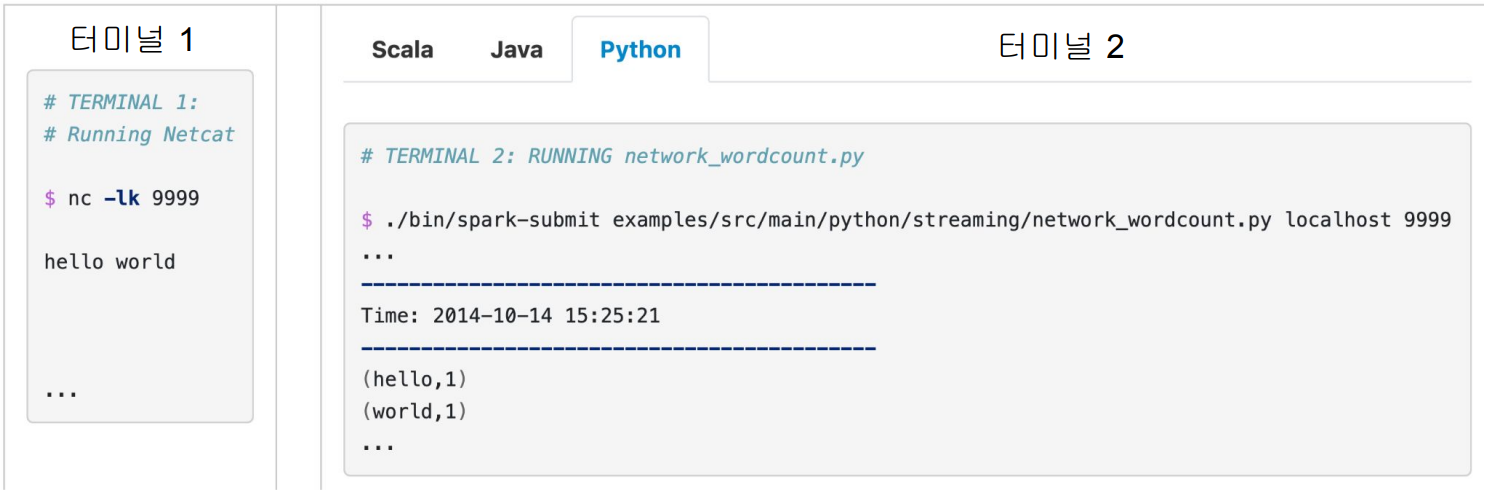
터미널 1에서 Streaming 데이터를 만들고
터미널 2에서는 PySpark으로 Structured Streaming을 사용해 터미널 1에서 만들어낸 텍스트 데이터를 파싱해 단어 수를 카운트할 겁니다.
nc는 Netcat으로 설치 필요, 9999는 타이핑한 데이터를 보낼 포트 번호
WordCount 예제 - Data Producer (터미널 1)
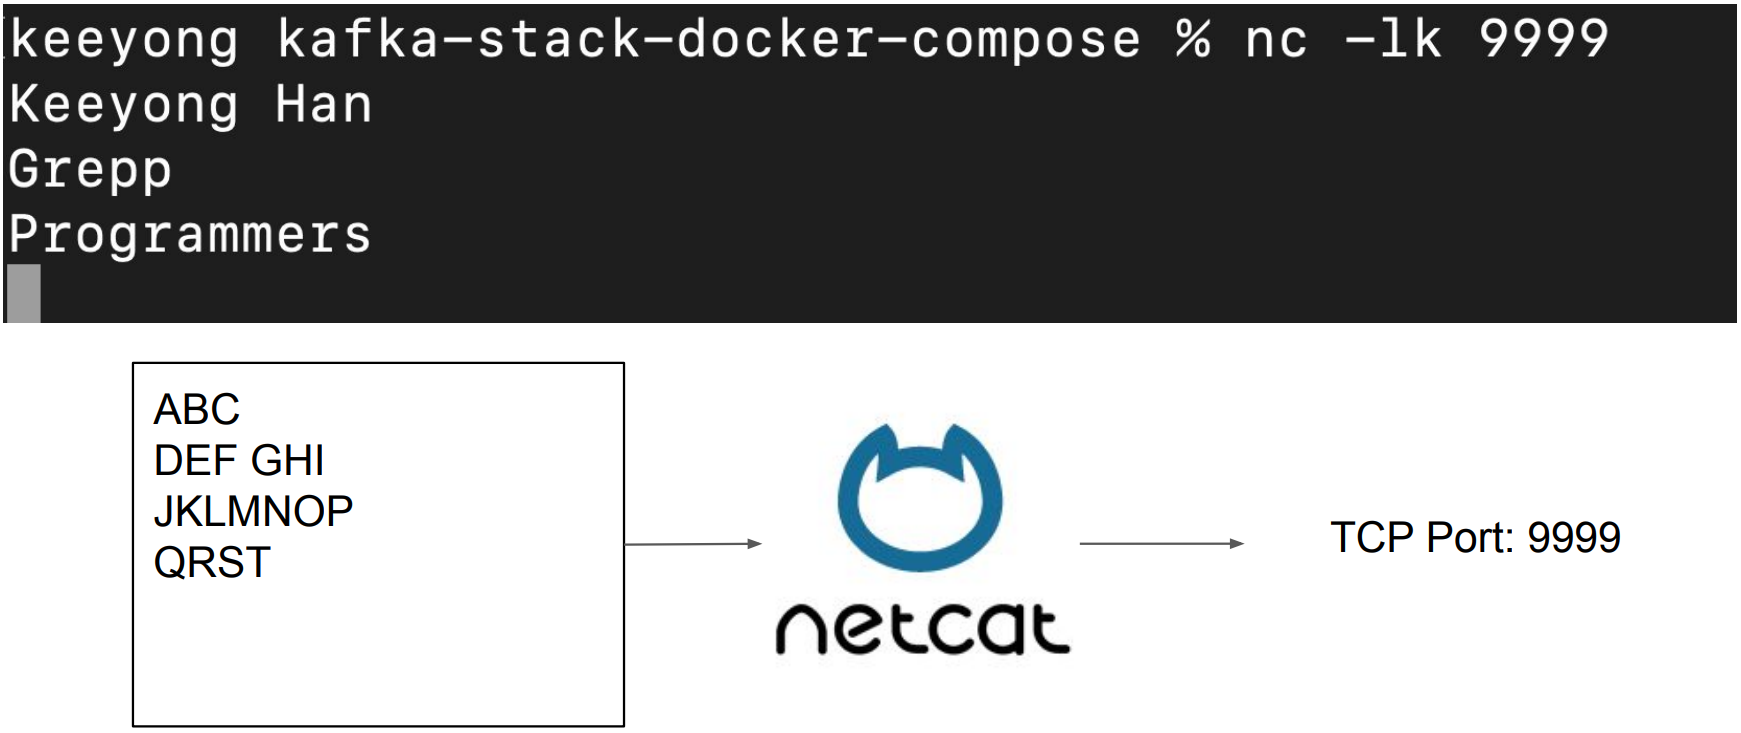
Netcat을 사용해서 텍스트 스트림을 생성 (우리가 타입하는 텍스트 바탕)
Netcat은 우리가 터미널에서 타이핑한 내용을 지정된 포트 번호로 포워드해주는 역할을 합니다.
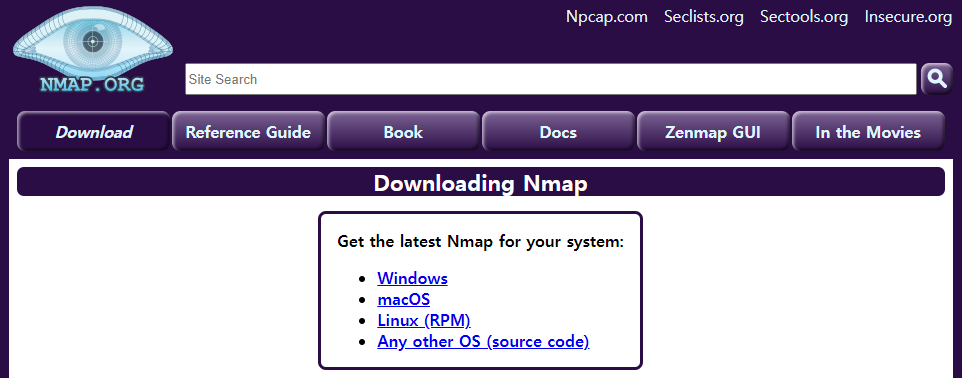
먼저 Netcat을 다운로드받아서 설치: https://nmap.org/download.html
WordCount 예제 - Data Producer (터미널 1)
Netcat을 포트번호 9999번에 데이터를 보내도록 실행
그리고 여기서 입력한 텍스트는 모두 TCP 9999번으로 보내짐
WordCount 예제 - Data Consumer (터미널 2)
SPARK_HOME이 설정되어 있어야함
코드 리뷰: wordcount_streaming.py
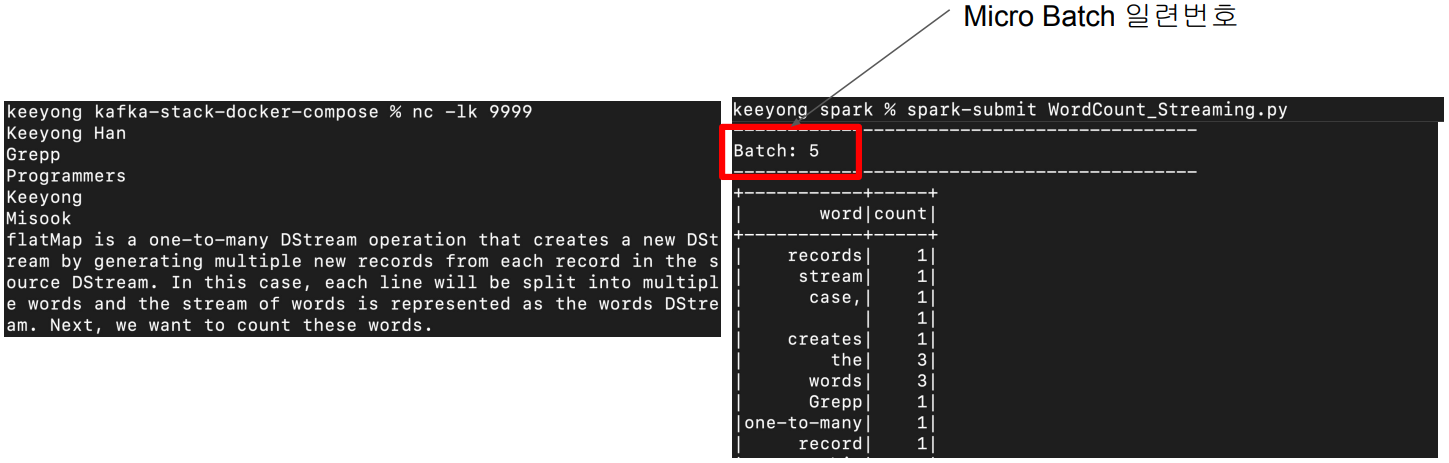
wordcount_streaming.py파일에는 Structured Streaming을 이용해 같은 로컬 호스트의 9999번을 보며 이곳에 데이터가 들어오면 그 데이터로 단어 수를 카운트해 디스플레이하는 코드가 적혀있습니다.
마이크로 배치이며 Micro Batch Trigger Option에 따라 배치를 동작합니다.
wordcount_streaming.py (1)
from pyspark.sql import SparkSession
from pyspark.sql.functions import *


if __name__ == "__main__":
    spark = SparkSession \
        .builder \
        .appName("Streaming Word Count") \
        .master("local[3]") \
        .config("spark.streaming.stopGracefullyOnShutdown", "true") \
        .config("spark.sql.shuffle.partitions", 3) \
        .getOrCreate()

    # READ
    lines_df = spark.readStream \
        .format("socket") \
        .option("host", "localhost") \
        .option("port", "9999") \
        .load()

(생략..)
wordcount_streaming.py (2)
(생략..)
	# TRANSFORM
    words_df = lines_df.select(expr("explode(split(value,' ')) as word"))
    counts_df = words_df.groupBy("word").count()

    # SINK
    word_count_query = counts_df.writeStream \
        .format("console") \
        .outputMode("complete") \
        .option("checkpointLocation", "chk-point-dir") \
        .start()

    print("Listening to localhost:9999")
    word_count_query.awaitTermination()
# TRANSFORM
words_df = lines_df.select(expr("explode(split(value,' ')) as word"))
counts_df = words_df.groupBy("word").count()
# SINK
word_count_query = counts_df.writeStream \
.format("console") \
.outputMode("complete") \
.option("checkpointLocation", "chk-point-dir") \
.start()
expr은 파이썬에서 문자열 형태의 파이썬 코드를 실행시키는 역할을 합니다. Spark Data Frame의 select 동작 방식에 맞춰 expr을 사용했습니다.
In PySpark, expr() is a function that parses an expression string and returns it as a Column object. This function can be used to express complex operations on DataFrame columns within a string.
.option("checkpointLocation", "chk-point-dir") \:
체크포인트는 Fault Tolerance와 Exactly Once를 가능하게 하는 Spark 구조화된 스트리밍의 메커니즘.
여기에는 스트리밍 쿼리의 메타데이터와 상태 정보를 HDFS 또는 Amazon S3와 같은 안정적인 스토리지 시스템에 일정한 간격으로 저장
크게 3단계 Read, Transform, Sink로 이루어진다는 점을 기억해주세요.
Spark Structured Streaming의 format 값
● parquet, json, csv, avro, …
파일에서 읽거나 파일에 쓰는 경우
● kafka
Kafka Topic에서 읽거나 쓰는 경우
● memory
메모리
● console
print해보고 싶다면
● socket
TCP를 통해 특정 Port에서 읽고 싶다면
Spark Structured Streaming Sink의 outputMode 값
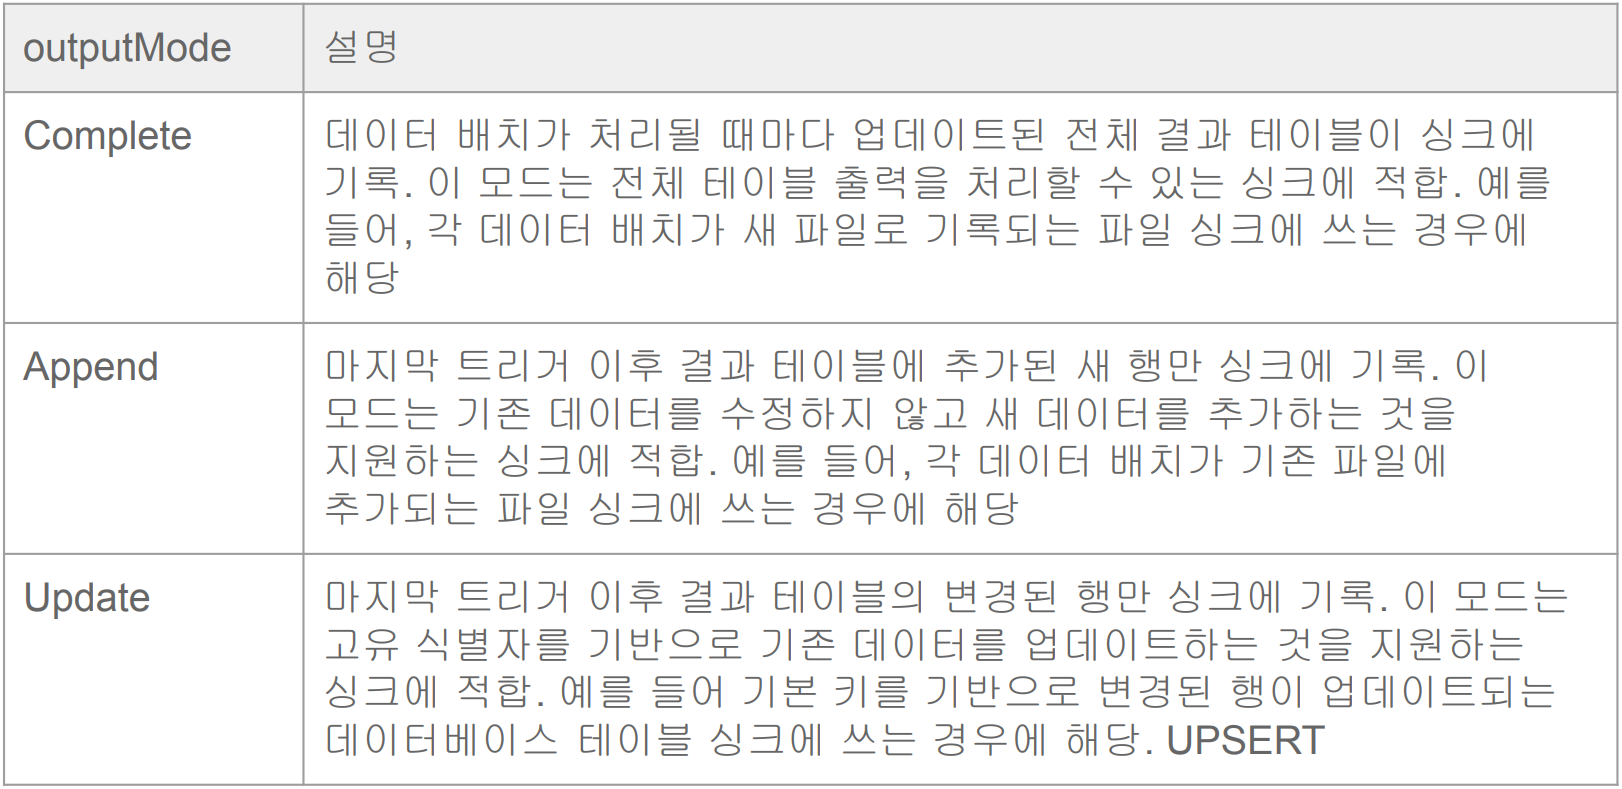
Complete는 Full Refreshment와 비슷
Append는 추가
Update는 UPSERT와 비슷 (=Incremental Update)
Spark Web UI 체크
http://localhost:4040/
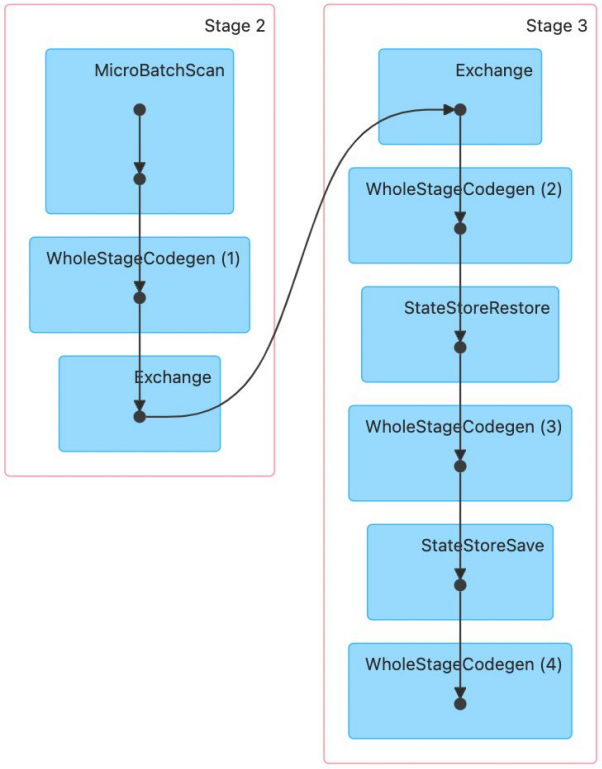
Exchange는 Group by 등으로 셔플링이 발생하는 경우라고 말씀드렸었습니다.
WordCount 데모
앞의 내용을 실제로 데모
Netcat 설치
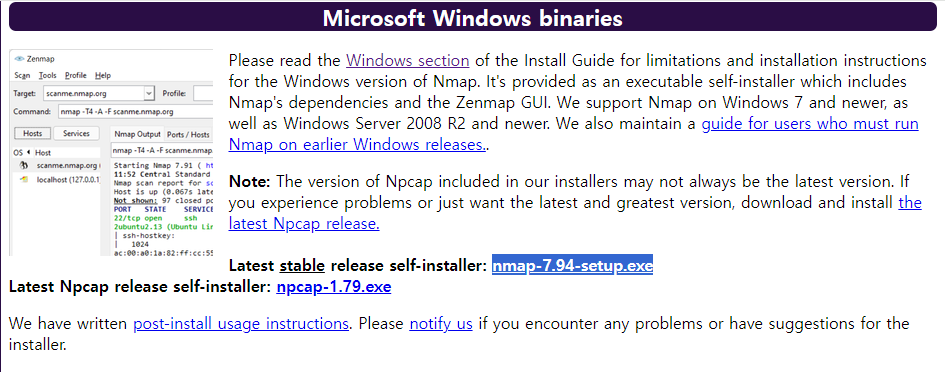
netcat을 설치합니다.
저는 윈도우를 사용하므로 nmap을 설치합니다. 하이라이트 된 Latest table을 다운 받겠습니다.
wordcount_streaming.py파일을 kafka-stack-docker-compose 디렉토리에 둡니다.
터미널을 3개 켭니다.
터미널 1
> ncat -l -p 9999
터미널 2
ncat localhost 9999
터미널 3
\kafka-stack-docker-compose % spark-submit wordcount_streaming.py
터미널2에서 별다른 입력이 없다면 터미널에서 계속 프린트가 되며 대기 상태에 돌입합니다.
outputMode가 complete이기 때문에 터미널에서 문자열을 입력할 때마다 입력되는 단어가 기존 테이블에 존재한다면 추가적으로 더해지며 Batch가 하나씩 늘어납니다.
Yes, your setup seems correct. Here's a brief explanation of what each shell is doing:
- The first shell is running ncat -l -p 9999, which starts a Netcat process that listens for incoming connections on port 9999.
- The second shell is running ncat localhost 9999, which starts another Netcat process that connects to the listening process on localhost:9999. Anything you type into this shell will be sent to the listening process.
- The third shell is running spark-submit, which starts your Spark streaming application. This application connects to ::1:9999 (which is the IPv6 equivalent of localhost:9999) and reads the data sent by the second shell.
When you type words into the second shell, they should appear in the Spark streaming output in the third shell. If this isn't happening, there might be a problem with the connection between the Spark application and the Netcat process.
Here are a few things you can check:
- Make sure the Netcat listening process (in the first shell) is still running when you start the Spark application. If the Netcat process stops for any reason, the Spark application won't be able to connect.
- Check the IP address and port number in your Spark code. The Spark application needs to connect to the same IP address and port number that the Netcat process is listening on. In your case, this should be ::1:9999.
- If you're still having trouble, you might want to try using the IPv4 address (localhost or 127.0.0.1) instead of the IPv6 address (::1). Some systems have trouble with IPv6 addresses.
'Kafka와 Spark Streaming' 카테고리의 다른 글
| 마무리와 숙제 (0) | 2024.01.26 |
|---|---|
| Kafka Stream 예제 프로그램 (0) | 2024.01.26 |
| Spark 환경설정 (0) | 2024.01.26 |
| Spark Streaming 소개 (0) | 2024.01.26 |
| 숙제 (0) | 2024.01.25 |


